2.3.5 Arpeggiator
The Arpeggiator is where you animate your arrangement with rhythmic patterns, sequences, and dynamic velocity shapes. Access it by clicking the Play tab at the top of the interface. The per-slot controls here edit the section shown in the Keyswitch selector at the lower left, one of the four; see SECTION 2.3.4 SECTIONS & KEYSWITCHES, F. What the Sections Mean for Editing.
The Play tab displays 10 instrument slots (5 visible at a time). Each slot appears as a Slot Row showing its arpeggiator status at a glance. Click any slot to expand its detailed editor view.
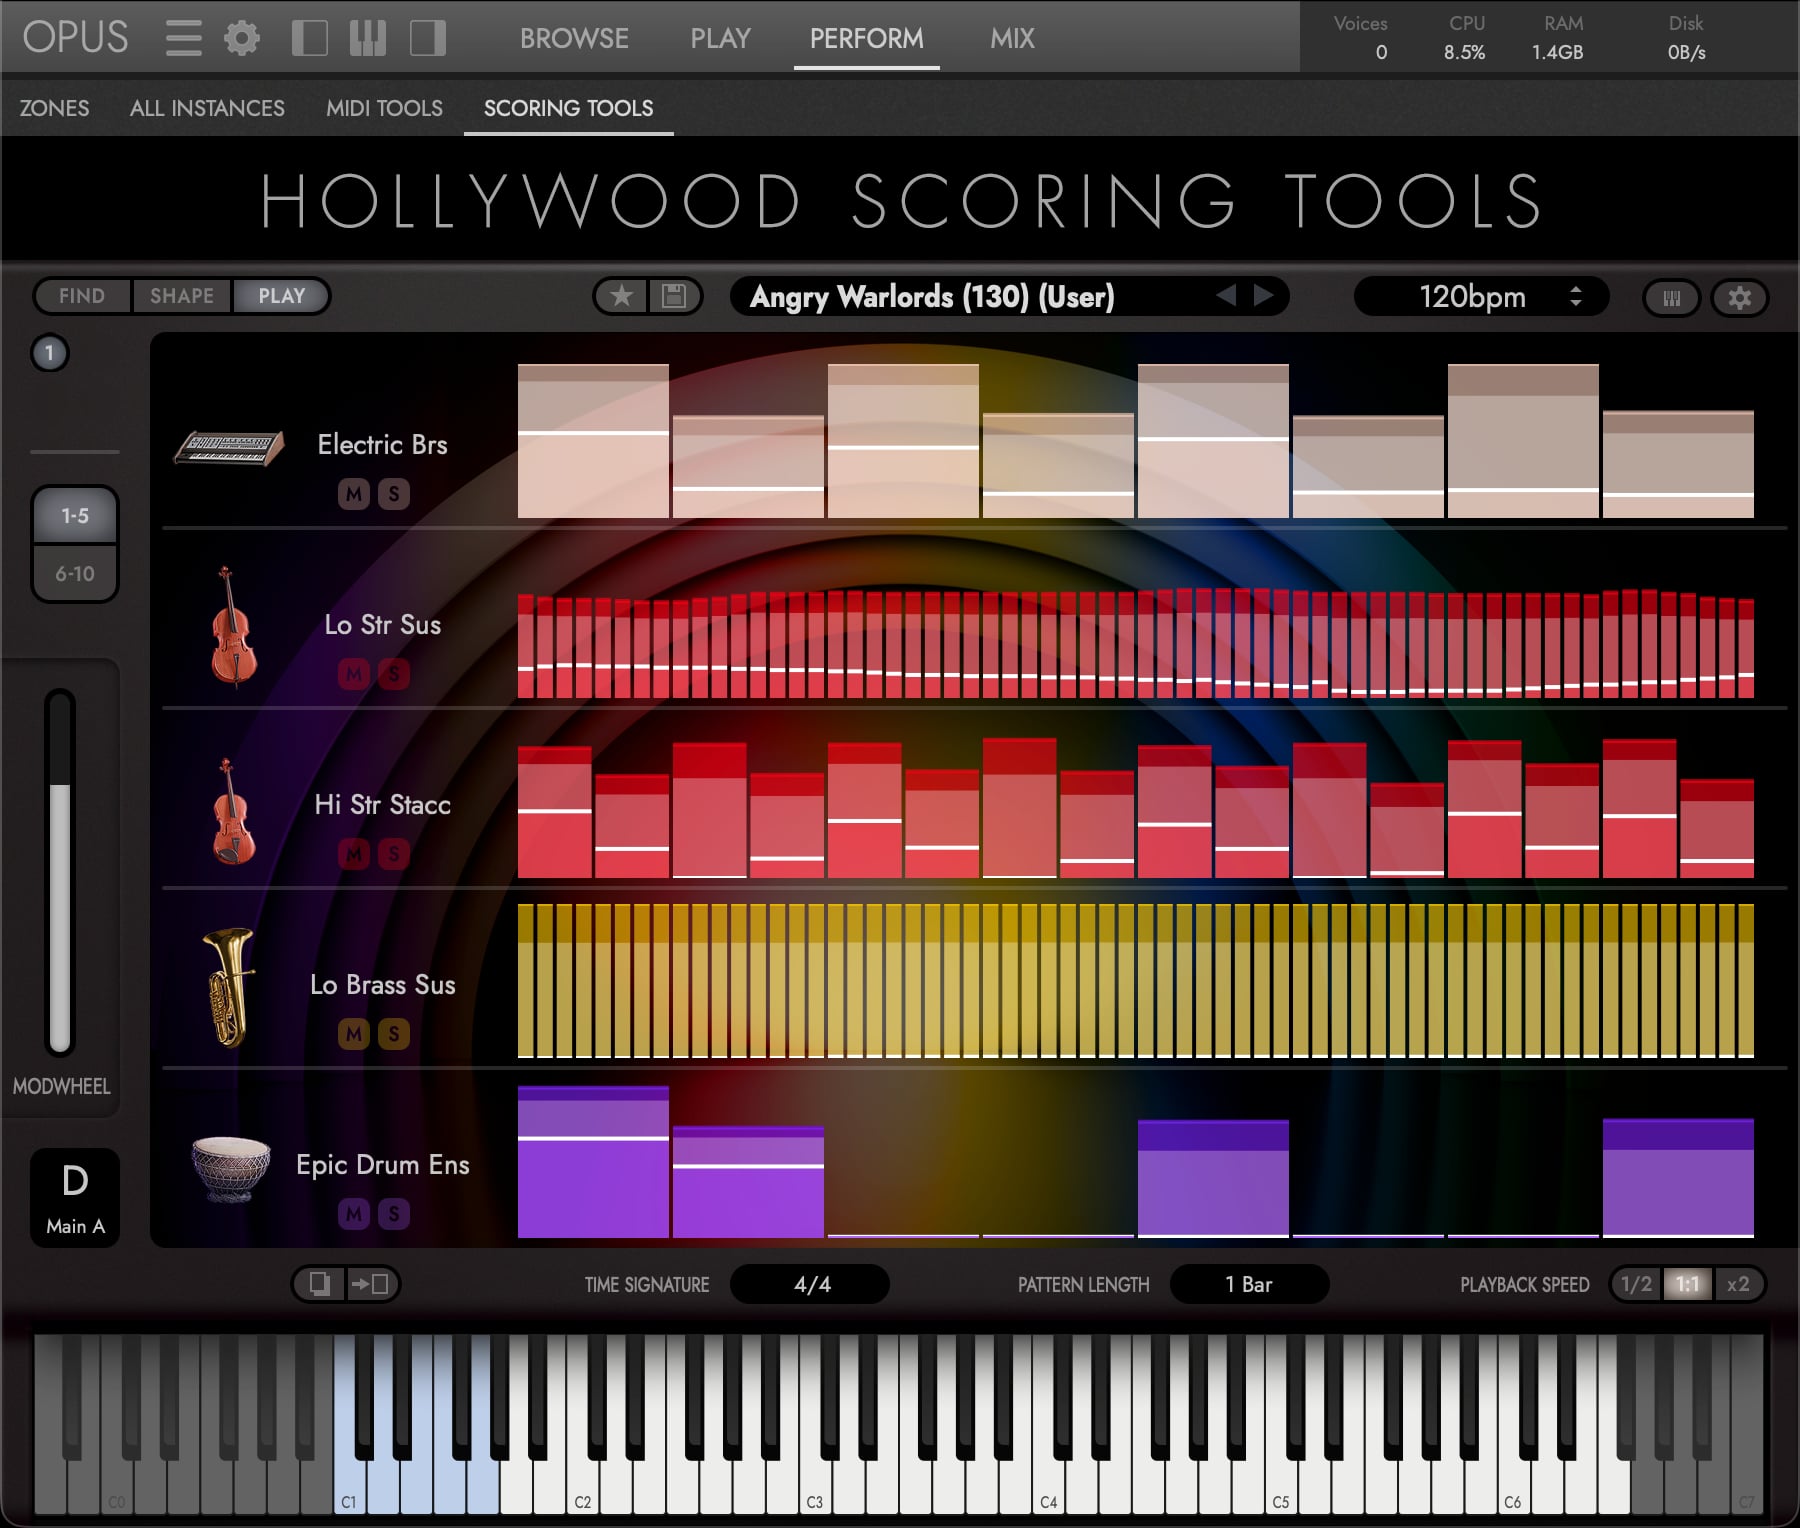
A Global Controls
Along the bottom of the Play tab, the Global Controls affect the entire arrangement:
| Control | Options | Description |
|---|---|---|
| Time Signature | 4/4, 3/4, 6/8, 5/8, 7/8 | Time signature for the arrangement |
| Pattern Length | 1 Bar, 2 Bars, 4 Bars | Pattern length in bars |
| Playback Speed | 1/2, 1:1, x2 | Half-time, normal, or double-time |
B Per-Slot Arpeggiator
Each slot has an independent arpeggiator with the following controls:
Note Order: 12 Patterns + Custom + All (Chord)
The Note Order determines how held notes are played back. The dropdown contains 14 selectable entries (organised into four groups separated by visual dividers in the menu):
| Pattern | Description |
|---|---|
| Custom | User-programmed pitch sequence (see Pitch Matrix below) |
| All (Chord) | Play all held notes simultaneously |
| Up | Ascending pitch order |
| Down | Descending pitch order |
| Up & Down | Ascending then descending |
| Down & Up | Descending then ascending |
| Zig-Zag Up | Alternates outer to inner: lowest note, highest, second-lowest, second-highest, and so on |
| Zig-Zag Down | The mirror: highest note, lowest, second-highest, second-lowest |
| Zig-Zag Up/Down | Zig-Zag Up, then bounced back without repeating the end notes |
| Zig-Zag Down/Up | Zig-Zag Down, then bounced back without repeating the end notes |
| Move In | Notes converge from outer to inner |
| Move Out | Notes diverge from inner to outer |
| Move In & Out | Converge then diverge |
| Move Out & In | Diverge then converge |
Rate
The step timing for the arpeggiator. Seven rates are selectable:
| Rate | Description |
|---|---|
| 1/32 | Thirty-second notes |
| 1/16, 1/16 T | Sixteenth notes (straight and triplet) |
| 1/8, 1/8 T | Eighth notes (straight and triplet) |
| 1/4, 1/4 T | Quarter notes (straight and triplet) |
PLEASE NOTE: A further value, Sustain, holds notes instead of stepping them. It is applied automatically when a Sustain-type instrument (a pad or string sustain, for example) loads into a slot. It is not offered as a manual choice in the rate menu.
Note Selection: 9 Modes
Note Selection filters which of the held notes are passed to the arpeggiator:
| Mode | Description |
|---|---|
| Off | All held notes |
| Lowest | Only the lowest held note |
| Lowest 2 | The two lowest held notes |
| Middle | The middle held note(s) |
| Middle 2 | The two middle held notes |
| Top 3 | The three highest held notes |
| Top 2 | The two highest held notes |
| Top | Only the highest held note |
| Lowest + Highest | The lowest and highest held notes |
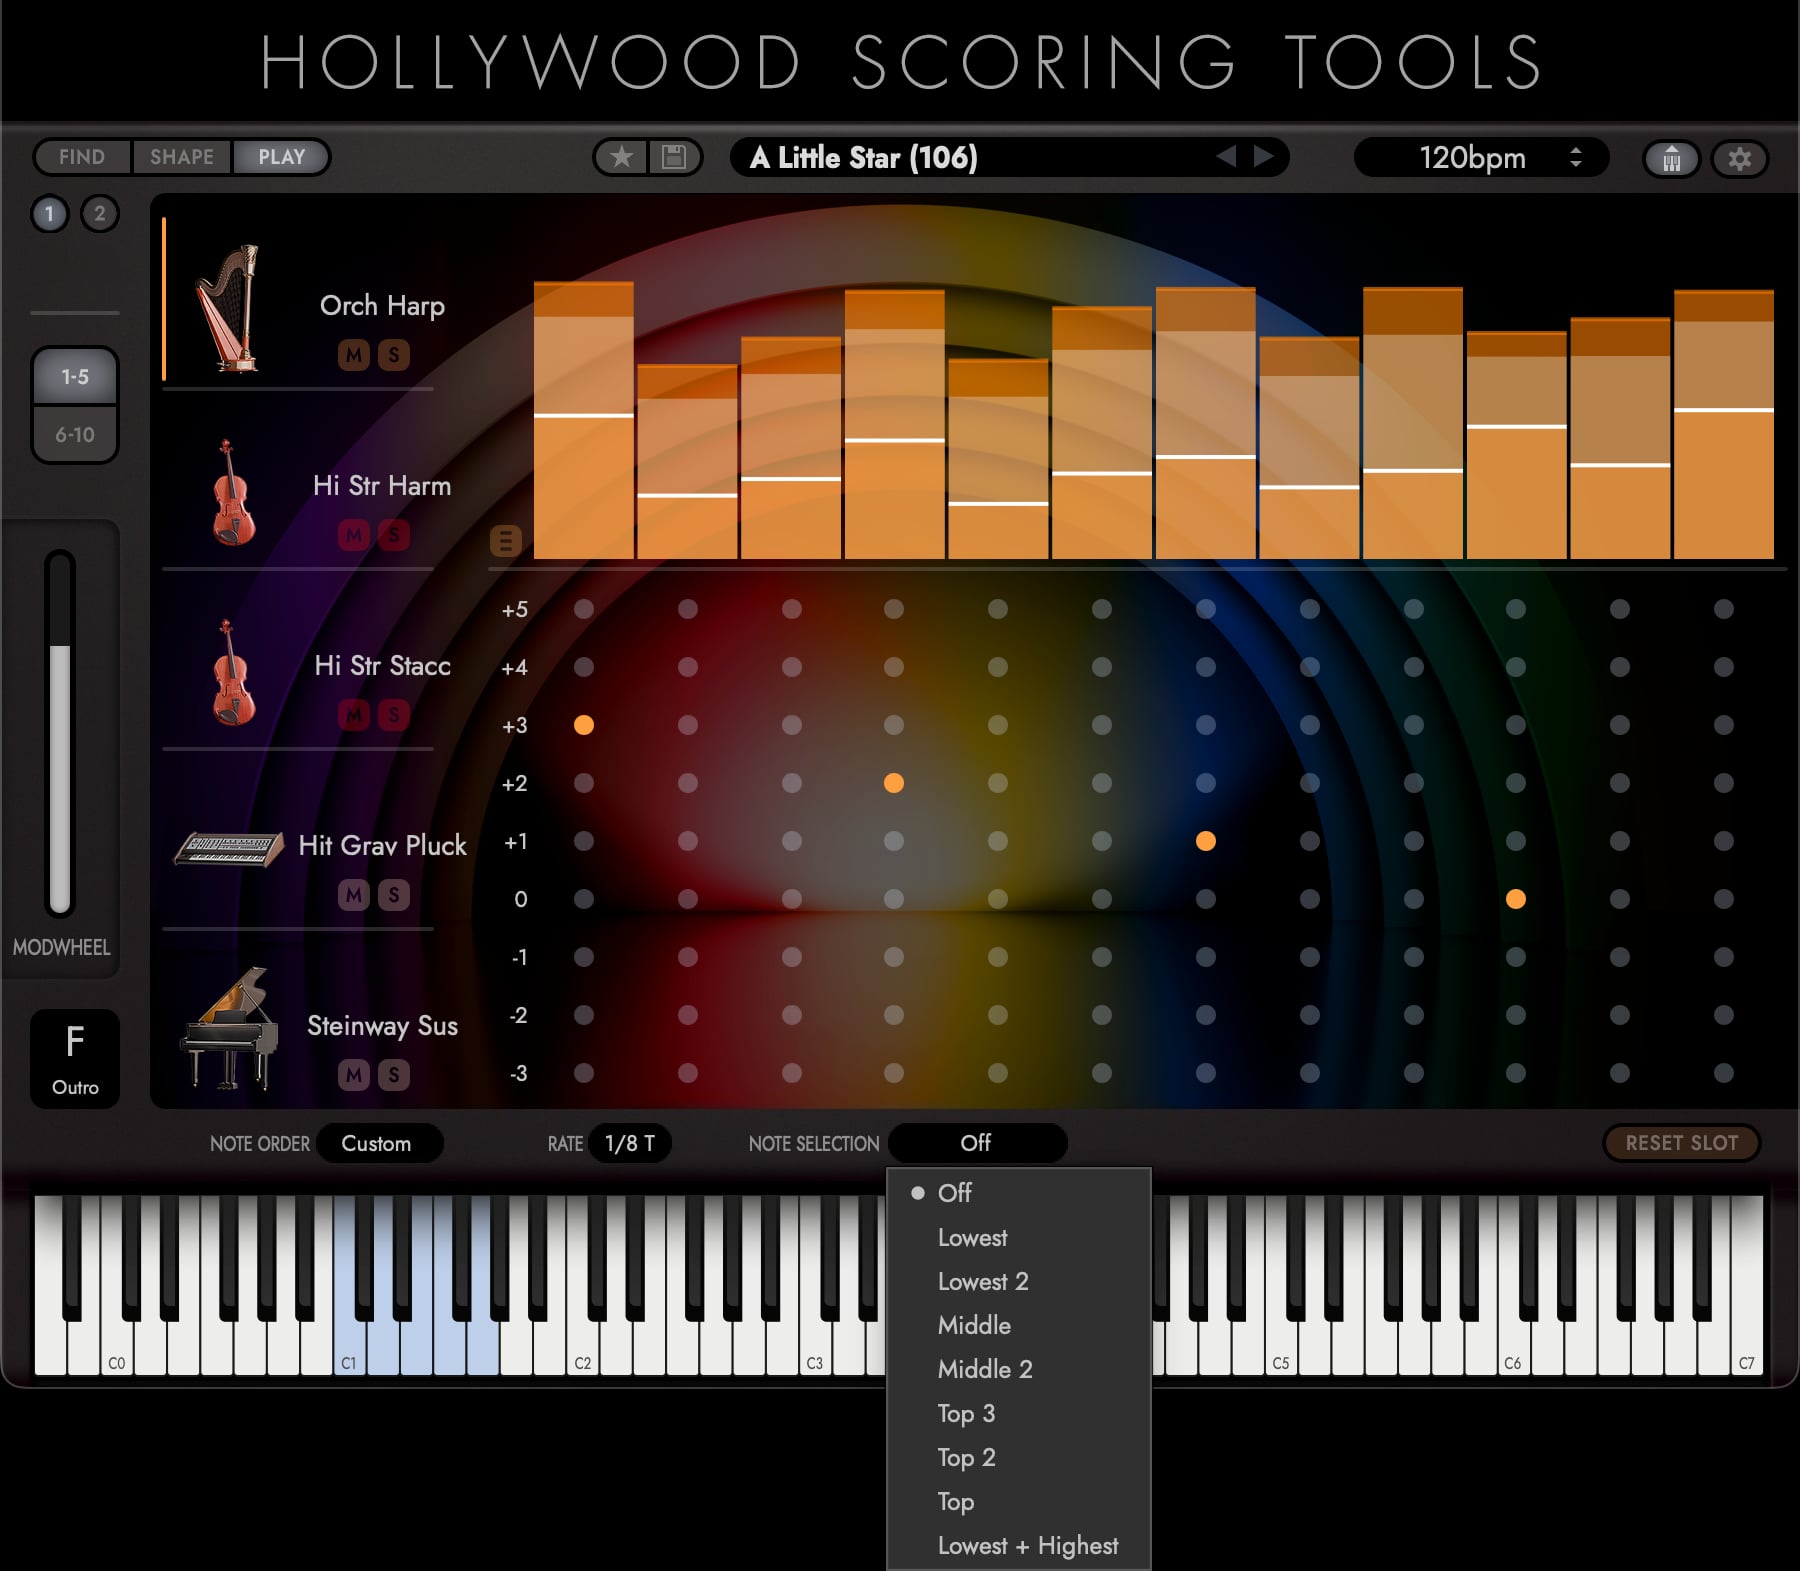
Choosing a selection for voicing: Note Selection lets you control voicing without changing what you play. Set a bass slot to Lowest so it tracks the root of your chords, give a melody or lead slot Top so it follows the highest note, and use Middle or Lowest + Highest on inner-voice slots to fill out the harmony without muddying the line. Because each slot has its own selection, a single held chord can drive a clean, well-separated arrangement across all 10 slots.
PLEASE NOTE: The Play tab shows only the controls that apply to the slot’s instrument. Sustained instruments, and any slot set to the Sustain rate, hide Note Order and Rate, since there are no steps to order or time. Drum kits hide Note Order and Note Selection, because their patterns are drawn per drum in the matrix rather than derived from a chord.
C Step Editor
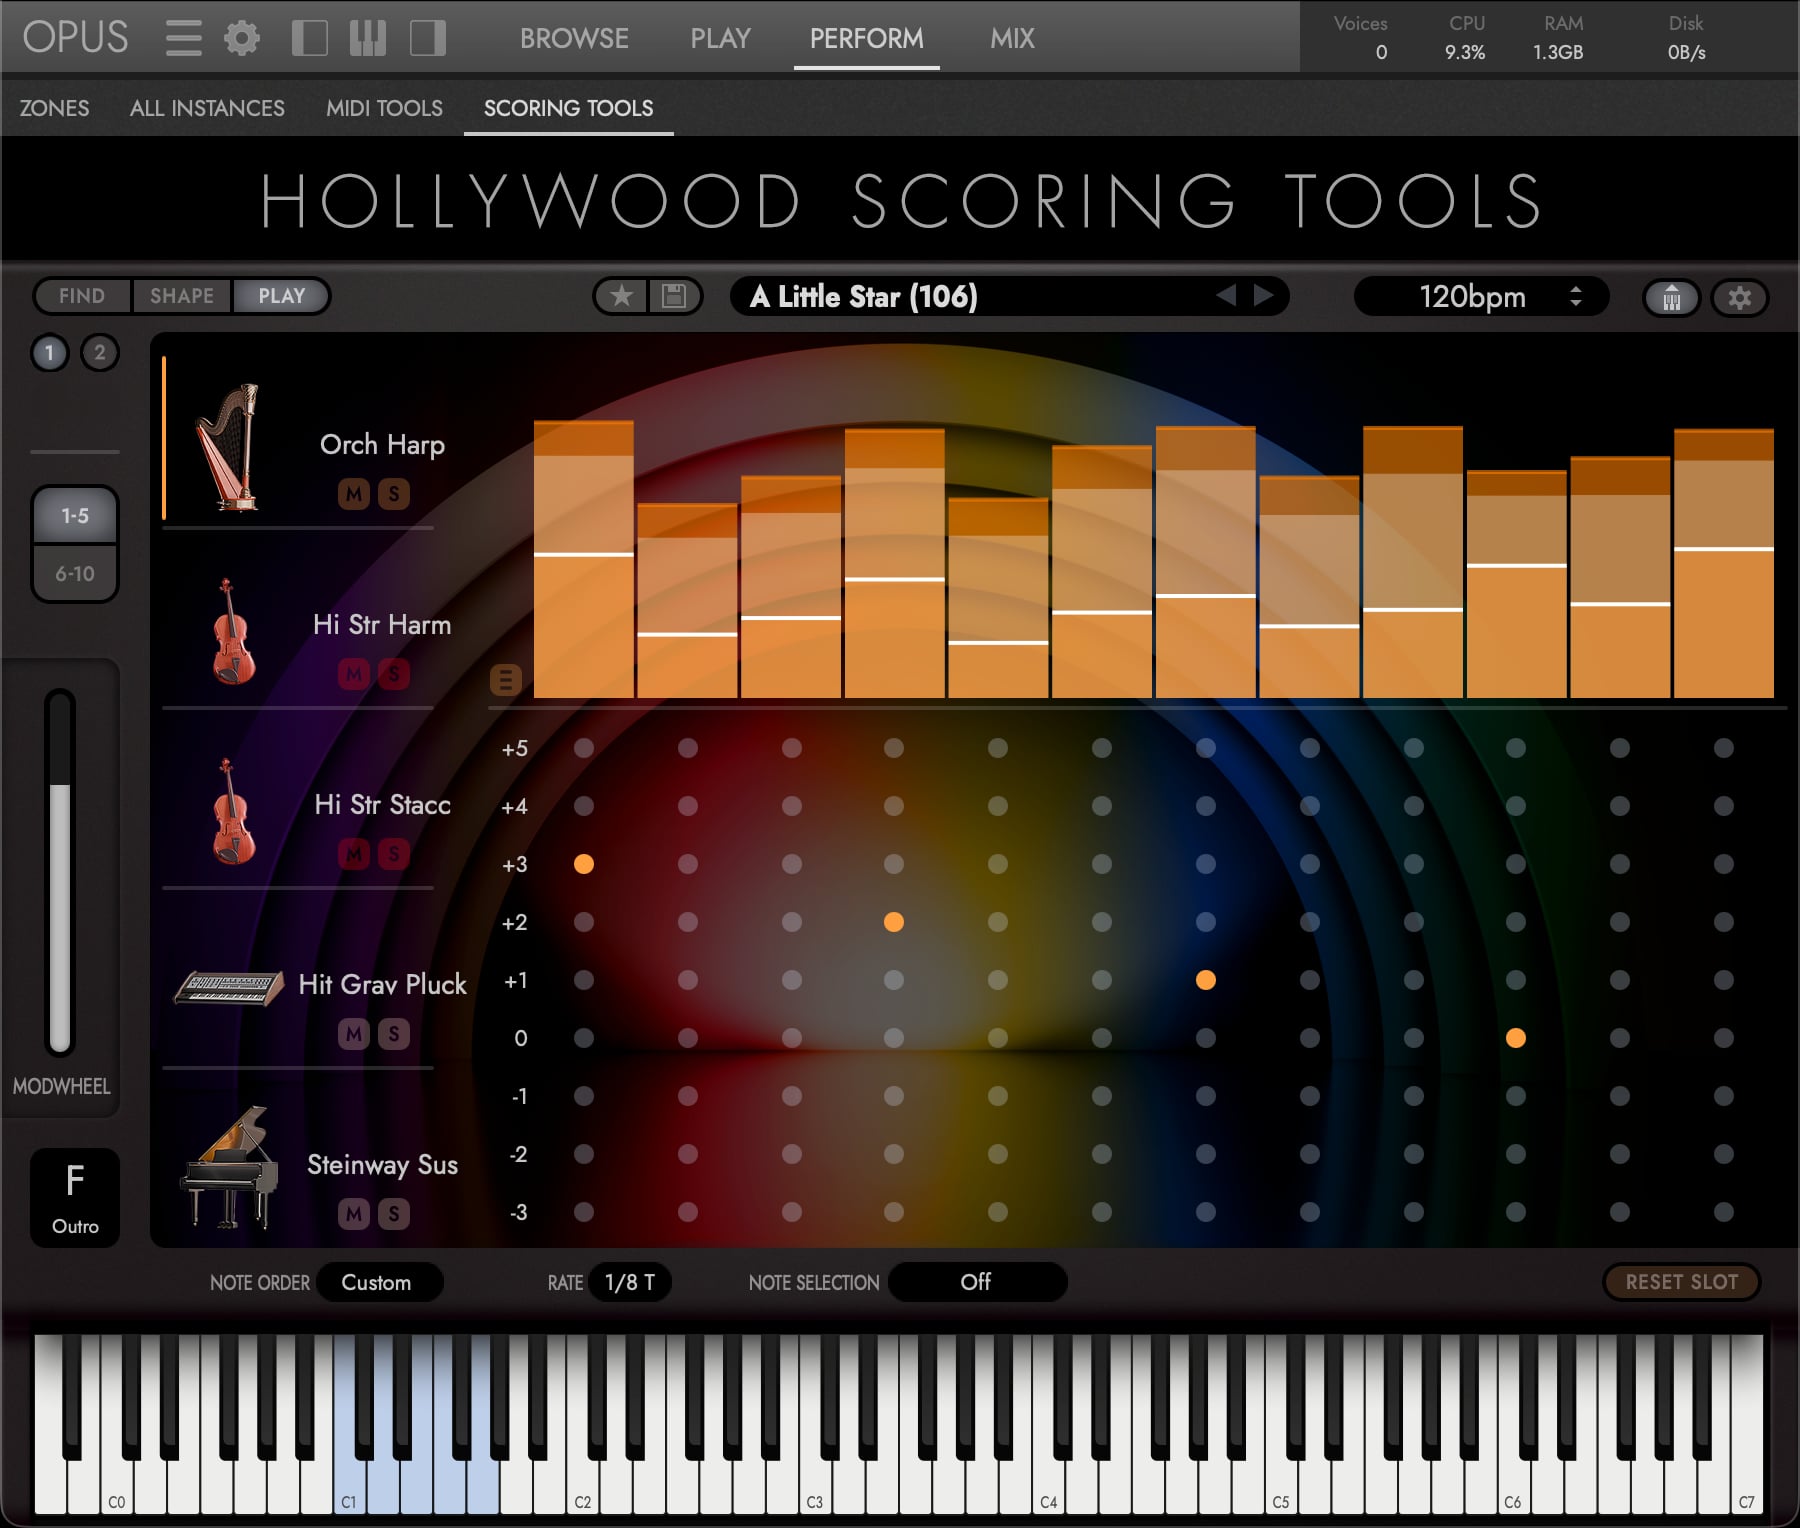
The expanded slot view reveals the Step Editor, a visual interface for programming velocity patterns. The Pitch Matrix described in the next section sits directly beneath it, so both are in view at once whenever a slot is expanded.
- Each step in the pattern is represented by a vertical bar
- Each bar has min and max handles for velocity, tied to the Mod Wheel
- At mod wheel 0, steps play at their min velocity; at mod wheel 127, they play at max velocity
- Draw velocity patterns by clicking and dragging the handles
The number of steps depends on the time signature, the Rate set on the slot, and the bar length.
D Pitch Matrix
The Pitch Matrix is the grid of dots below the Step Editor in the picture above.
When the Note Order is set to Custom, the Pitch Matrix becomes active. What its rows mean depends on the instrument in the slot:
- Pitched instruments: the rows are steps through the chord you are holding, not fixed pitches. The row marked 0 is the lowest note you are holding, +1 the next one up, and so on. Rows above the top of your chord wrap round and rise an octave, so a +4 step still sounds under a three-note chord, and the rows below 0 do the same downwards, -1 being the top note of your chord an octave lower.
- Drum kits: the rows are the kit’s individual sounds, labelled with the drum names, and the slot ignores the pitches you play entirely. Unused rows are greyed out.
Click a dot to sound that row on that step; click it again to clear it.
E Additional Per-Slot Controls
| Control | Description |
|---|---|
| Octave | Arpeggiator octave shift (0 to +2 octaves) |
| Repeat | Number of times each held note repeats per step (0 to 4) |
| Bar Reset | Labelled RESET on the slot. Restarts the pattern at each bar boundary (None / 1 Bar / 2 Bars) |
| Reset Slot | Reset the slot to default arpeggiator settings |
F Copy and Paste
Two facilities let you duplicate patterns instead of rebuilding them by hand.
Per-slot sequence menu: each expanded slot has a sequence-options menu with:
| Option | Action |
|---|---|
| Copy All / Paste All | Copy or paste the slot’s entire pattern for the current section: every bar, with its velocities and custom note offsets |
| Copy Bar / Paste Bar | Copy or paste just the currently selected bar |
| Clear | Erase the slot’s pattern for the current section |
All-slot section copy: the Copy and Paste buttons at the left end of the Play tab’s bottom bar act on all 10 slots at once. They copy the selected section’s patterns across the whole arrangement and paste them back into the selected section, a fast way to seed Main B from Main A for every slot and then vary it.
G Exporting to Your DAW
The finished performance can be dragged straight into your DAW as a standard MIDI file. Grab the MIDI Export button on the Controls Bar and drop it onto a track: Hollywood Scoring Tools writes a multitrack MIDI file with one track per slot (each track named for the instrument loaded in that slot) capturing the generated notes and dynamics exactly as they play back. From there you can edit, re-voice, or re-orchestrate the arrangement with any instruments you like.
There is nothing to arm. Capture is automatic and playing fills in the buffer. In a DAW it follows the host transport, so a pass recorded while the transport rolls is what you get; standalone, capture starts from your first note and ends when you release.
PLEASE NOTE: Each new pass replaces the last one: starting to play clears the buffer and begins again. Drag the MIDI Export button onto a track before you play the part again, or the take you wanted is gone. If you want a performance kept for certain, record it to a MIDI track in your DAW as you play instead of relying on the drag buffer.